Introduction
I’ve used pd before to talk about other concepts in audio here. Now, I want to write about yet another fundamental concept: the Doppler Effect. This time I also want to show you how to apply this concept in Unity so if you’re not really interested in the pd part, you can jump right into the Unity section.
The Doppler effect is a shift in the perception of sound pitch as the source emitter moves relative to the listener. This change in pitch happens because the wavelength changes as the source moves. If the emitter is getting closer, the soundwave is getting compressed, which results in a reduced wavelength, thus increasing the pitch. Note that what changes is the distance between the two - the frequency emitted by the source didn’t change, so the waves that are travelling through the air will have to fit in that distance. Conversely, as the emitter moves away, the waves are spread through a larger distance, making the distance between the peaks of the wave become longer and the distance between rarefactions (low-pressure areas when particles are spread apart from each other) shorter. In practice, this means that the wavelength is extended, lowering the pitch.
This physical phenomenon happens with light and water waves as well, for instance, and it is named after the Austrian physicist and mathematician Christian Doppler, who described the phenomenon in 1842.
 Fig. 1 - Representation of the Doppler effect by Charly Whisky, CC BY-SA 3.0, via Wikimedia Commons
Here’s a train I recorded to illustrate the concept. Feel free to use the sample, if you want.
Why is it useful to me?
In our daily lives, we observe this phenomenon with moving vehicles, trains and other sound emmiting objects that pass by us, as we could hear in the sample I provided before. Another commonly used example is the ambulance sound. The Doppler effect gives us a perception of location as things move closer or farther away from us. In game audio, we can use this in our favor to create an environment that provides information about the surroundings to the player, translate realism and enhance immersion in the game world.
Implementation with Pure Data (Pd)
PATCHING WITH HEADPHONES IS DANGEROUS. PLEASE BE CAREFUL, PATCH SAFELY!
We’ll try to recreate this effect using pure data. For this I’ll use an [osc~] object that will be my emitter and the listener will be our output. I’m adding a [mtof] to manage the input values more effectively, but you could use just the frequency value. A time-varying delay line [delwrite~] will represent the air that sound travels through, this object needs 2 arguments: a name and a defined length in msec.
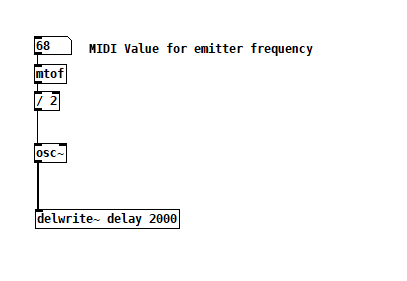 Fig. 2 - Writing into the delay line
Just so we can have a better visualization, I’ll add a table with the original input and then, I’ll add another one so we can see what’s going on further in the signal chain.
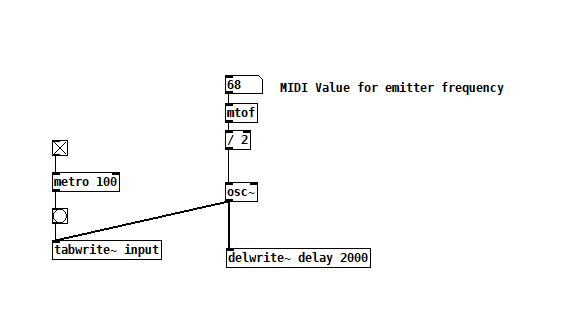 Fig. 3 - Using [tabwrite~] for visualization
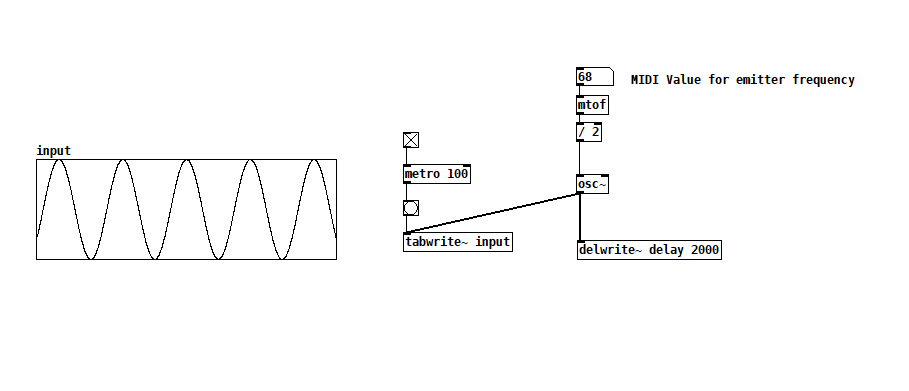 Fig. 4 - Input signal table
Then, we need to read from the [delwrite~] and we want to control how much of the delay we’re reading. For that we’ll use [delread4~] and add an Hslider the delay time - the max value for the delay time should be the one defined in the [delwrite~] object because the delay line is constantly being refreshed: we can’t read into the past nor the future (PUCKETTE, 2007). When we change the input value for the delay amount being read in this object, it will work as a simulation of the movement of the emitter and we can observe a Doppler shift. When we increase the delay, we’ll hear a pitch drop, if we decrease the value, we’ll hear a raise in pitch.
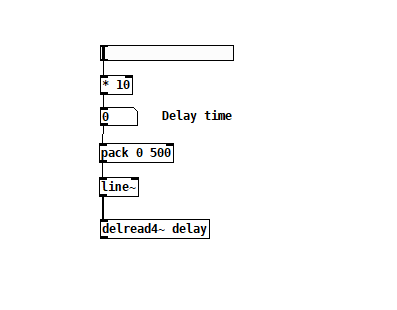 Fig. 5 - Reading delay line
We’ll finally add another table for visualization and some volume control. Note that the difference of amplitude you can see in the tables is because I’m being careful with the output volume. This is just a simple implementation and you could add more stuff to it, like amplitude modulation or panning for instance.
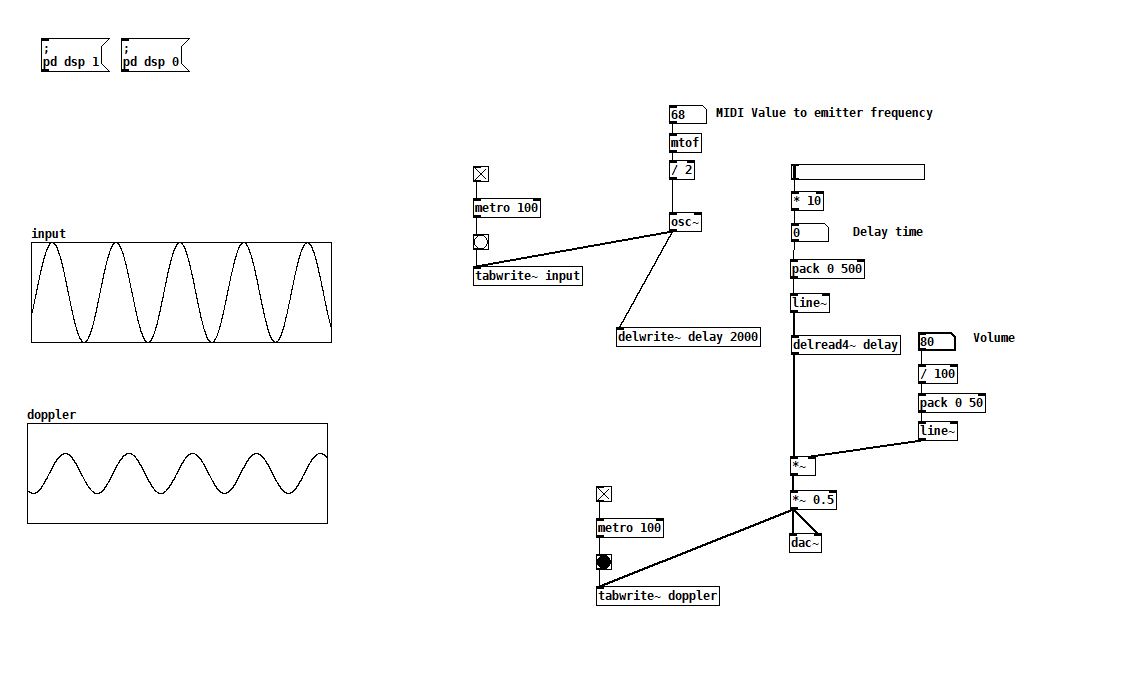 Fig. 6 - Patch view
I’ve also added buttons to move close or move away from the listener. They’re basically counters that will control the movement of the slider up or down and I’m using a canvas to keep it cleaner. I’ll leave a link to the patch in the references section.
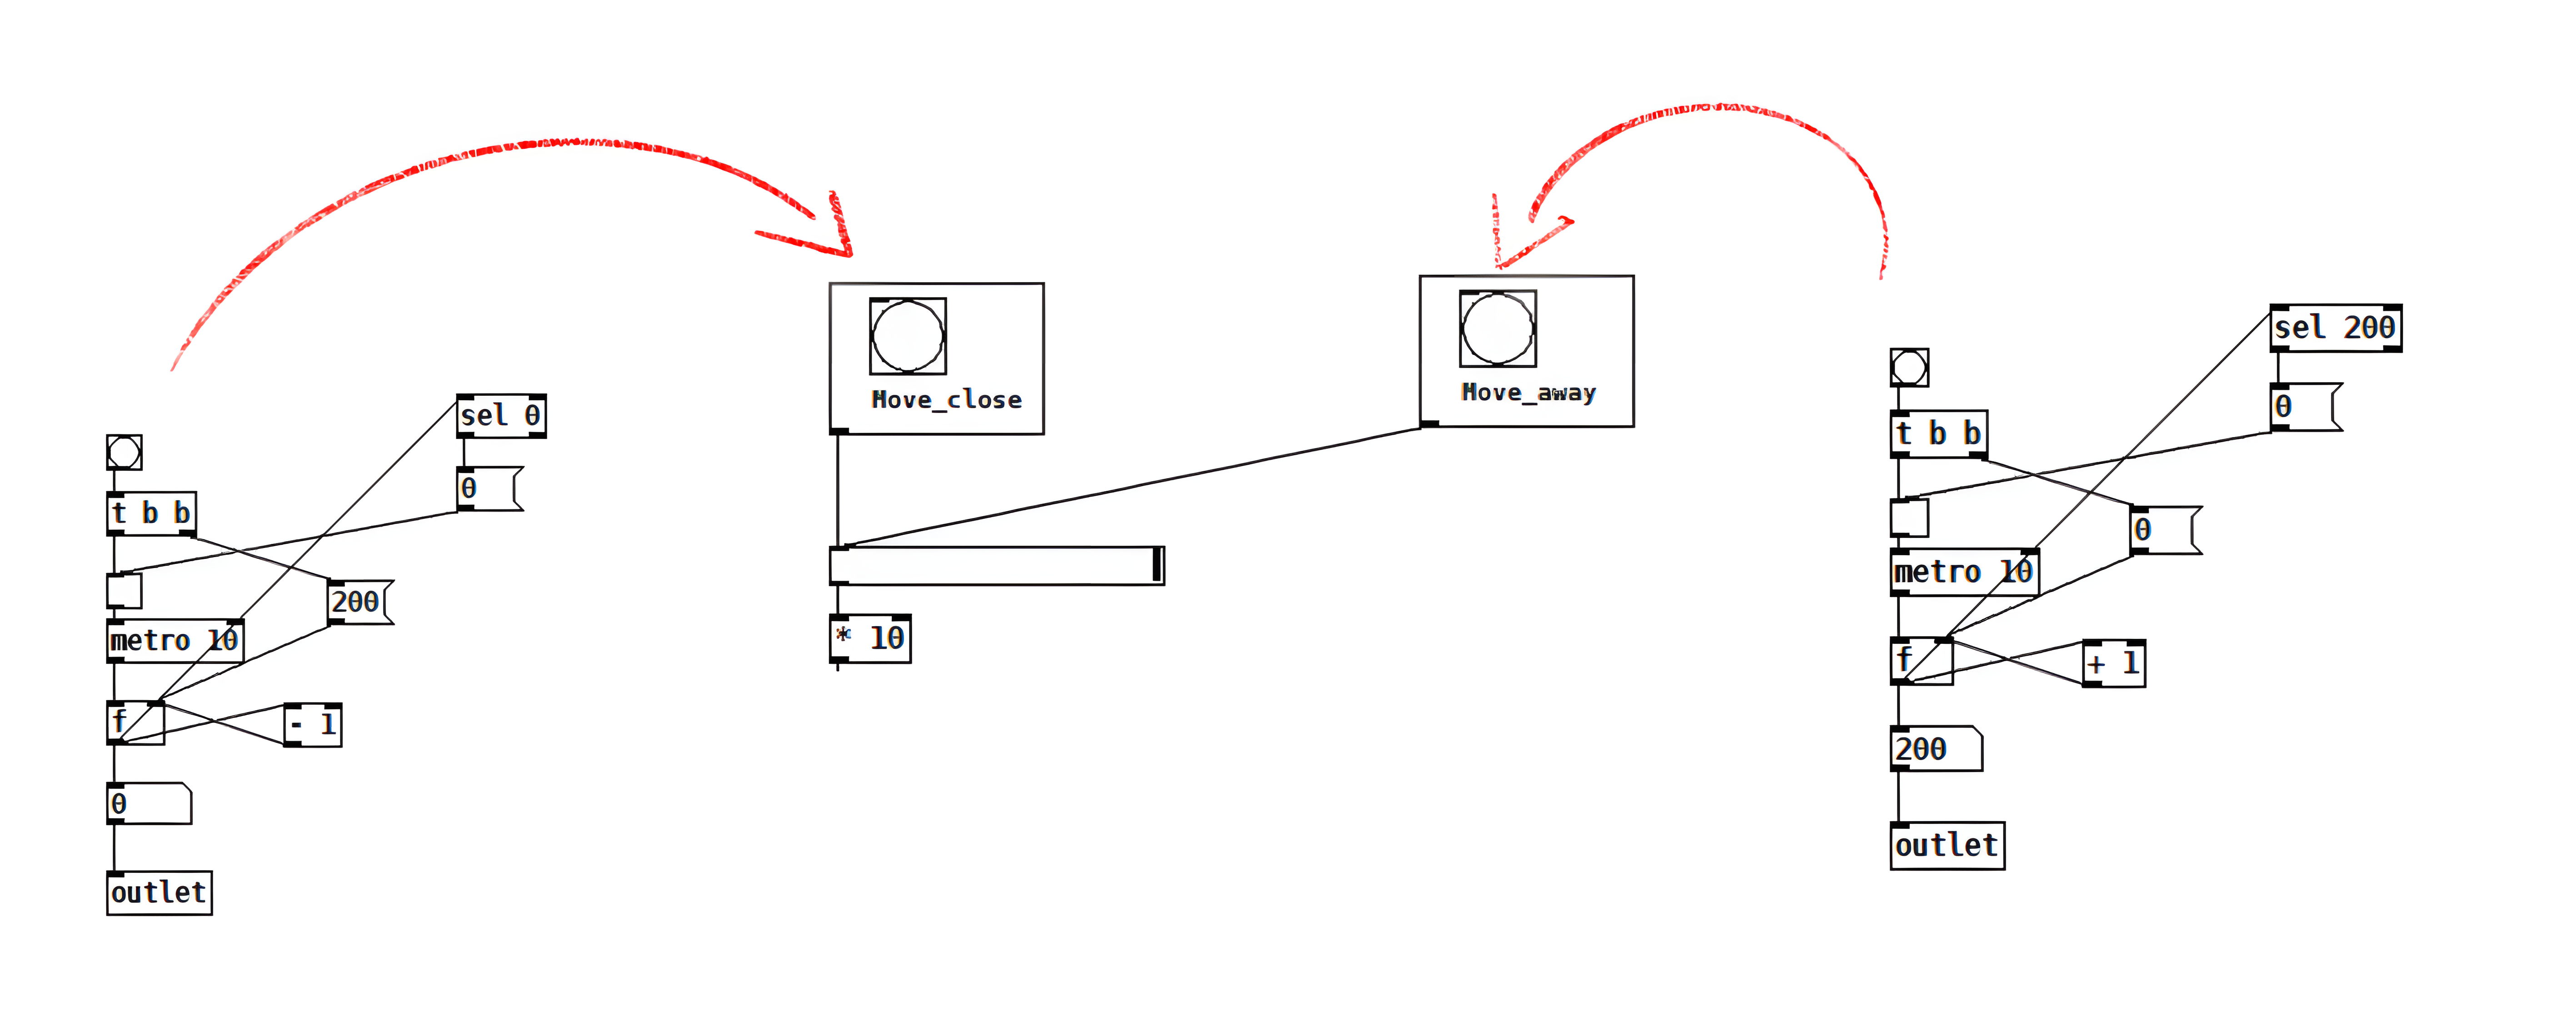 Fig. 7 - Buttons for control
Implementation with Unity
Now that we have a better understanding of what is the Doppler effect and how we can simulate it digitally, how do I make it work in my game?
There’s different ways you can do this in Unity. You can do it via script, if you want to have more control over different parameters and make it more custom. One important thing to keep in mind from what we’ve already discussed, whatever method you choose, is that the condition for the doppler shift to happen is the relative movement between the source and the listener - if both are stationary, the shift won’t happen.
A simple implementation is possible through Unity’s built-in audio system. There is a global control called Doppler factor which is used to set how audible the Doppler effect is. - you can find it in the project settings under “Audio”. 0 will disable the effect, 1 will make it audible for fast moving objects (see documentation). The effect will be more prominent as the value increases, whereas values below 1 will diminish the perceived effect (SINCLAIR, 2020).
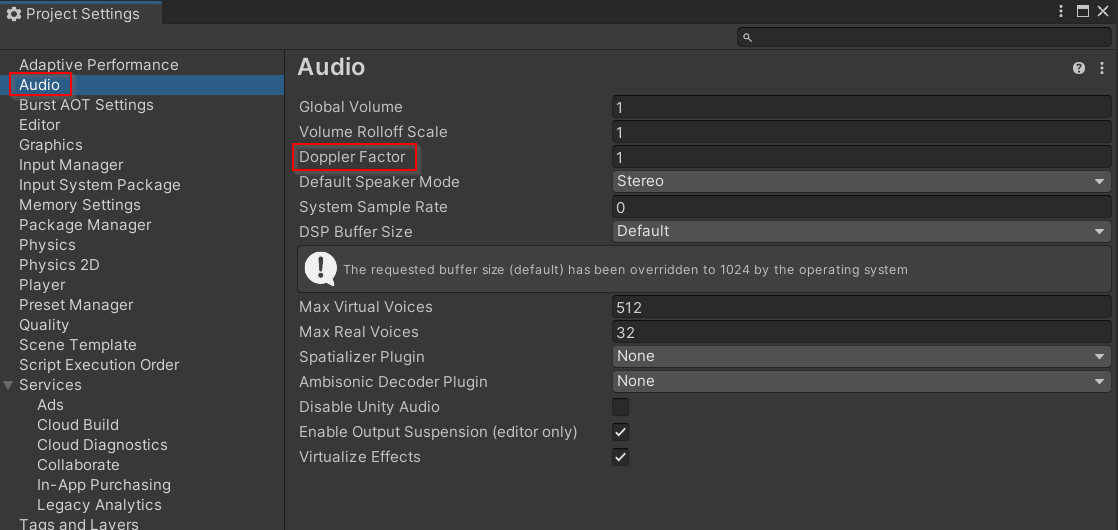 Fig. 8 - Doppler factor in project settings
To demonstrate this effect, I’ve created a scene with two objects: a cube and a cylinder. The cube will be the listener, the cylinder is the emitter and it has an engine sound. The cylinder will move back and forward relative to the listener then stop and repeat the movement. A script controls the movement of the object and its speed.
1
2
3
4
5
6
7
8
9
10
11
12
13
14
15
16
17
18
using UnityEngine;

public class MoveObject : MonoBehaviour
{
    Vector3 pos1;
    Vector3 pos2;
    [SerializeField] Vector3 posTrans= new Vector3 (0f, 0f, 0f);
    [SerializeField] float speed = 1f;

     void Start(){
        pos1 = transform.position;
        pos2 = transform.position + posTrans;
     }

     void Update(){
        transform.position = Vector3.Lerp(pos1, pos2, Mathf.PingPong(Time.time*speed, 2f));
     }
}
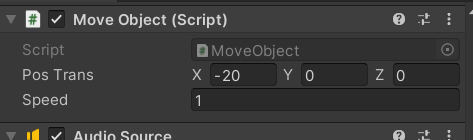 Fig. 9 - Parameters exposed to the inspector
Then, we’ll add an audio source to the cylinder, set it to loop and set the spatial blend to 3D.
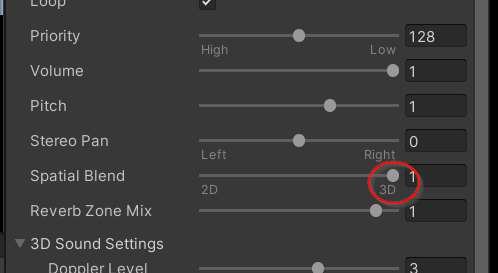 Fig. 10 - Audio source - spatial blend property
Now you can set the Doppler level for the audio source: in the audio source component, under the 3D Sound settings you’ll find the Doppler level parameter, which you need to set a value greater than 0. 0 means that the Doppler effect won’t be applied, setting to a value greater than 0 will cause the pitch of the sound to change as the audio source moves relative to the listener. The speed variable in the script allows us to have better control to observe the effect.
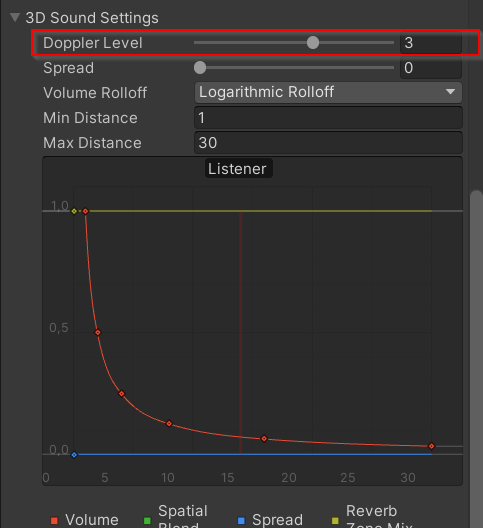 Fig. 11 - Doppler level property
As a final example, I’ll show you an implementation via script, which can be very useful depending on your context. We’ll have to create a new script, which I’ll name “DopplerEffect” and add it to the object that emits the sound. What this script will do is calculate the relative position and speed of the object emitting the sound with respect to the listener and use that information to adjust the pitch of the audio source.
We’ll first add the references to the Audio Source and Listener components, then, add a timeScale parameter to control the intensity of the Doppler effect and finally min and max pitch will define the limits for the pitch shift.
1
2
3
4
5
6
7
8
9
public class DopplerEffect : MonoBehaviour
{
    [SerializeField] AudioSource audioSource;
    [SerializeField] Transform listener;
    [SerializeField] float timeScale = 1f;
    [SerializeField] float minPitch = 1f;
    [SerializeField] float maxPitch = 2f;
    MoveObject moveObject;
}
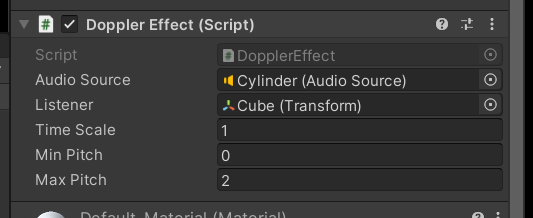 Fig. 12 - Doppler script variables in the inspector
Now we need to get the reference to the script that controls the movement and also make its speed variable accessible so we can use it here.
1
2
3
4
5
6
7
8
9
10
11
12
13
public class DopplerEffect : MonoBehaviour
{
    [SerializeField] AudioSource audioSource;
    [SerializeField] Transform listener;
    [SerializeField] float timeScale = 1f;
    [SerializeField] float minPitch = 1f;
    [SerializeField] float maxPitch = 2f;
    MoveObject moveObject;

    void Awake(){
        moveObject = FindObjectOfType<MoveObject>();
    }
}
In the update method we’ll first calculate distance and position: subtracting the listener’s position from the audio source’s position to get the relative position and using the magnitude property to get the length.
1
2
3
4
5
void Update(){
    //distance and position
    Vector3 relativePos = moveObject.transform.position - listener.position;
    float distance = relativePos.magnitude;
}
Then we’ll need to access the object speed to calculate its relative speed and use that relative speed to calculate the doppler effect and cobtrol the audio source’s pitch property.
1
2
3
4
5
6
7
8
9
10
11
void Update(){
    //distance and position
    Vector3 relativePos = moveObject.transform.position - listener.position;
    float distance = relativePos.magnitude;
    //calculate the relative speed between the audio source and the listener
    float relativeSpeed = Vector3.Dot(relativePos.normalized, listener.forward) * moveObject.speed;
    //calculate Doppler shift
    float dopplerShift = relativeSpeed / (moveObject.speed + distance);
    float pitch = Mathf.Lerp(minPitch, maxPitch, dopplerShift * timeScale + 0.5f);
    audioSource.pitch = pitch;
}
When implementing the effect, tweak the parameters to see what works for your specific case but keep in mind to make it engaging while also serving the purpose of the game. If the intention is to enhance immersion and provide information, but the effect becomes too distracting, it will have a negative impact instead.
Final note
Well, that’s it for now! We’ve seen 3 different implementations of the doppler effect, I hope this can help you understand the fundamentals behind it and how to apply it in your project. As usual, I encourage you to take a look at the references section, where you can find materials to check the information and deepen your knowledge on the subject if you are interested. See you next time!
References
Sinclair, Jean-Luc. Principles of game audio and sound design: sound design and audio implementation for interactive and immersive media. CRC Press, 2020.
Puckette, Miller. The theory and technique of electronic music. World Scientific Publishing Company, 2007.
Github repository (patches here):
https://github.com/nico-audio/pd-patches
Unity audio documentation (Doppler factor): https://docs.unity3d.com/Manual/class-AudioManager.html